The hustle to finish the last projects is upon us. With cold temperatures, drying winds, and snow cover of winter just around the corner, preparation must begin. Winter means problems if proper measures aren’t taken.
Sprinkler systems can be totally destroyed by a prolonged freeze so it is pertinent to conduct winterization of your irrigation system. Techniques for draining water in an irrigation system are, manual drain, automatic drain, and blow out method.
Even if you have drained the water out of your irrigation system, some water remains and can freeze, expand, and crack PVC piping. Polyethylene pipe is used in many freezing climates. Although polyethylene pipe is more flexible and can expand under pressure, water left inside can freeze and rupture the pipe walls.
Manual Drain Method
Use the manual drain method when manual valves are located at the end and low points of the irrigation piping. To drain these systems, simply shut off the irrigation water supply and open all the manual drain valves.
Once the water has drained out of the mainline, open the boiler drain valve or the drain cap on the stop and waste valve (whichever is used in your area) and drain all the remaining water that is between the irrigation water shut off valve and the backflow device. Open the test cocks on the backflow device. If your sprinklers have check valves, you’ll need to pull up on the sprinklers to allow the water to drain out of the bottom of the sprinkler body. Depending on the location of the drain valves, there could be some water left in the backflow, the piping, and the sprinklers. When all the water has drained out, close all the manual drain valves.
Automatic Drain Method
Use this method when automatic drain valves are located at the end and low points of the irrigation piping. These will automatically open and drain water if the pressure in the piping is less than 10 PSI. To activate these, shut off the irrigation water supply (shut off will be located in the basement and will be either a gate/globe valve, ball valve, or stop and waste valve – see drawings below) and activate a station to relieve the system pressure.
Once the water has drained out of the mainline, open the boiler drain valve or the drain cap on the stop and waste valve (whichever is used in your area) and drain the remaining water that is between the irrigation water shut off valve and the backflow device. Open the test cocks on the backflow device. If your sprinklers have check valves you’ll need to pull up on the sprinklers to allow the water to drain out the bottom of the sprinkler body. Depending on the location of the drain valves, there could be some water left in the backflow, the piping, and the sprinklers.
In some areas you might have a combination of the manual drain system on the mainline (the pipe between the irrigation water shut off valve and the valves) and auto drain system on the lateral lines (the pipe between the valves and the sprinklers).
Blow Out Method
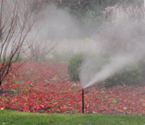
Extreme care must always be taken when blowing out an irrigation system with compressed air. Compressed air can cause serious injury including serious eye injury from flying debris. Always wear ANSI approved safety eye protection and do not stand over any irrigation components (pipes, sprinklers, and valves) during air blow out. Serious personal injury may result if you do not proceed as recommended. It is best for a qualified licensed contractor to perform this type of winterization method.
Conducting a Blow Out
The blow out method utilizes an air compressor with a Cubic Foot per Minute (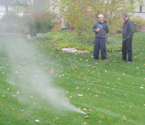 CFM) rating of 80-100 for any mainline of 2″ or less. Be aware, a small shop compressor (1-3 HP) will not have enough “free” air to properly winterize the system. Do not attempt to fully charge the holding tank then release the highly-pressurized air flow into the mainline to compensate for the compressor’s lack of CFM. The compressor is attached to the mainline via a quick coupler, hose bib or other type connection, which is located after the backflow device.
Compressed air should not be blown through any backflow device. To start the blow out, shut off the irrigation water supply and, with the compressor valve in the closed position, attach the air compressor hose to the fitting. Activate the station on the controller that is the zone or sprinklers highest in elevation and the furthest from the compressor. Close the backflow isolation valves. Then, slowly open the valve on the compressor. This should gradually introduce air into the irrigation system. The blow out pressure should remain below the maximum operating pressure specification of the lowest pressure rated component on that zone and should never exceed 80 PSI.
Each station/zone should be activated starting from the furthest station/zone from the compressor, slowly working your way to the closest station/zone to the compressor. Each station/zone should be activated until no water can be seen exiting the heads; this should take approximately two minutes or more per station/zone. It is better to use two or three short cycles per station/zone than to have one long cycle. Once the station/zone is dry, you should not continue to blow air through the pipe. Compressed air moving through dry pipes can cause friction, which will create heat and could cause damage. Never run the compressor without at least one irrigation control valve open.
Additional Steps
Once the water has been removed from the irrigation system, disconnect the air compressor and release any air pressure that may be present. If your backflow device (the most common backflow installed is called a Pressure Vacuum Breaker) has ball valves, open and close the isolation valves on the backflow device numerous times to ensure that any trapped water has escaped from the upper areas. Leave the isolation valves open at a 45° angle (approximately 1/2 open) and open the test cocks.
Types of Valves
Shut off the water supply to the signal control tube(s) and drain the field tubing.
Outdoor mounted controllers
Leave the power on and the dial / switch in the “OFF” position. The heat from the transformer will keep the enclosure warm enough to keep condensation from forming inside the controller enclosure. The dial in the “OFF” position will keep the controller from activating the solenoids in the field.
Indoor mounted controllers
Leave the power on and the dial / switch in the “OFF” position. This will prevent the controller from activating the solenoids in the field.
Rain Sensors
There is very little winter preparation required for rain sensors. If your sensor is the type with a cup or bowl that catches water, you might want to remove the water and place a plastic bag over the sensor. This will keep any water from accumulating and freezing in the cup or bowl area.
Pressure Vacuum Breaker
 PVB Test Cocks
- Isolation Ball Valve Inlet
- Isolation Ball Valve Outlet
Interior Point of Connection in Freezing Climates
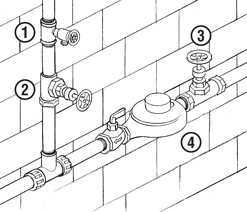
- Boiler Valve
- Irrigation Shut Off Valve
- Main Water Shut Off Valve
- Water Meter
 Gate Valve
 Ball Valve
 Stop and Waste Valve
 Boiler Valve
The Don’ts of Blow Out Winterization
Extreme care must always be taken when blowing out the system with compressed air. Compressed air can cause serious injury, including serious eye injury, from flying debris. Always wear ANSI approved safety eye protection and do not stand over any irrigation components (pipes, sprinklers, and valves) during air blow out.
- Do not allow the air pressure to exceed 80 PSI for systems with PVC piping and 50 PSI for systems with polyethylene piping.
- Don’t leave flow sensors installed. Always remove them first and seal the pipe to avoid damage to the sensor.
- Do not stand over component parts while the system is pressurized with air.
- Don’t leave the air compressor unattended.
- Do not blow the system out through a backflow or pump. First blow out the system, then drain the backflow or pump.
- Don’t leave the manual drain valves open after the blow out.
In Conclusion
Conducting a fall blowout of an irrigation system, getting all of the water out of your irrigation pipes, will prevent damage to the pipes and the moving parts in a system. Winterization doesn’t have to be difficult. Most of the tasks fit into a regular course of maintenance and contribute to having a healthy landscape year-round. Taking a little bit of extra care in the design process and throughout the year preserves a homeowner’s investment in the landscaping and will keep the garden healthy long into the future.
For article source click here. To read more from Rain Bird click here.


